Map

Welcome Pilot. I am Zhilaa Katdinal, Divisional Chief of the TRI Bureau of Stellar Cartography. I've heard you needed some help using your sector map, and I was hoping we could work out some sort of.... deal. You see, I helped design that system, so I can tell you everything you need to know about it. The thing is, we're a little light on sector information from The Gurge...

This documentation briefly reviews basic map usage and functions. The map can be accessed in flight by pressing 'm', or in station by pressing the button labeled 'map' in the upper right hand corner.

Some pilots prefer to have a hard copy map on hand, just incase their in flight systems should fail. TRI's most current 2D map can be found under the "TRI Files" subheading of the flight academy.


TRI Sector Map Module

The standard TRI sector map module come pre-installed on all ships, and can be accessed from any station. Activating the map will display a 3D representation of every known sector.

This module consists of four main components and functions: a 3D map display, waypoints, visibility options, and view controls.


3D Map Display

The map display is the core object of the map module. This display contains three basic objects: sectors, stations, and jumppaths. Right clicking on a sector or station will zoom in on the selected object.

Sector - Represents a known space location. Color changes depending on sector control.

Station - Represents a space station. Colored per faction.

Jumppath - A blue line that represents the space spanned by jumpgates.


Map Waypoints

The TRI map module uses two types of waypoints: mission waypoints and user defined waypoints. (Displayed below.)

Mission waypoints are set at time of mission accept, and user waypoints can be set at any time. Waypoints will only remain active on your map until the marked sector is visited. (Certain mission waypoints will remain until the mission has been completed.)

Mission Waypoint - Displays locations of space which are directly involved with the current mission.

User Defined Waypoint - Displays waypoints of your choosing.


Travel Advisory System

The TRI Travel Advisory System (TAS) system places indicators on the flight map to alert pilots to sectors which might be hazardous due to recent combat activity. Originally intended as a safety measure, TAS is also useful to bounty hunters or factional combat pilots looking to see where "the action is".

Cargo pilots intending to pass through a Hazard Zone are urged to hire or otherwise arrange combat escort, as a precaution.

Amber Travel Zones - indicate relatively low levels of threat, usually an isolated incident, or an event that happened several minutes in the past and now represents "stale" information.

Red Travel Zones - indicate recent or sustained combat action and are best avoided by peaceful traffic.


Visibility Options

The visibility options are located in the lower left hand corner of the map. These options can be used to display sectors based on faction location or control.


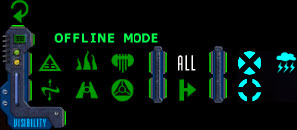
To display sectors by faction location, disable both the 'all' and 'control' buttons (located in the center function set). Now select each faction that you would like to be displayed from the first tier. (The TRI logo represents neutral sectors.) Sectors near the selected faction will now be displayed.

To display sectors by control, enable the 'control' button, and select each faction whose control you would like to see displayed.

To display all sectors, enable the 'all' button again.

In the third tier, on the far right, are two waypoint icons. By disabling these buttons each waypoint type can be displayed or hidden. To the right of the waypoints is a weather cloud icon, which toggles weather visibility.

Map tip: you will notice that sectors that are affected by a weather storm are tinted to the color of the storm. To quickly determine stormy sectors, disable the "all" visibility option and the weather visibility option. You will now be able to quickly and accurately determine which sectors to stay away from.


View Controls

The view controls are located in the lower right hand corner of the map. This section of the map interface contains camera control functions such as zoom, slide, and rotate.


The square button in the middle of the map control module will reset the map to a top down view, and the 'x' button in the lower right hand corner will close the map.